
Cleaning and Maintaining Your Argentine Grill
We’re writing this on a morning where our part of the country saw its first snowfall of the season. But we’re still an Argentine grill company, and our minds are on grilling.
More to the point, we’re thinking about how to clean one of our grills. Whether you’re a die-hard barbecue enthusiast who grills year-round, or someone who’s been avoiding an off-season clean, where’s what you need to know about maintaining your Argentine grill.

We’re writing this on a morning where our part of the country saw its first snowfall of the season. But we’re still an Argentine grill company, and our minds are on grilling.
More to the point, we’re thinking about how to clean one of our grills. Whether you’re a die-hard barbecue enthusiast who grills year-round, or someone who’s been avoiding an off-season clean, here’s what you need to know about maintaining your Argentine grill.
Start your clean by removing each of the grill’s detachable parts and letting them soak in warm, soapy water. Let them soak for at least 20 minutes.
Use a wire brush to clean most of the pieces. In the case of the grate, run the brush in the same directions as the bars on the grate.
Make sure you’ve removed soap residue from the grill pieces by heating up the grill and letting it sit for 15 minutes. Anything you didn’t rinse away will soon burn off.
If you have food residue on your grill’s grates and can’t get rid of it with regular scrubbing, try this trick:
Mix two cups of vinegar with a cup of baking soda, and pour that mixture into a garbage bag.
Put the grates inside the bag, and seal it with a rubber band.
Let the grates soak inside the bag overnight.
Once they’ve soaked in the vinegar/baking soda mixture, remove the grates and rinse them. Any remaining residue should fall away, or come off with some light scrubbing.
Pat the grates dry and they’ll be ready for use once again.
If you plan on cooking through the winter, here are a few tips for cleaning your Argentine grill after every cook:
Clean the grate with a paper towel dipped in canola oil, a step that will prevent rust as well as giving your cooking surface the proper clean. Wipe in the same direction as the grate.
Your grill is easiest to clean when it’s still warm. This can make the canola-oil-on-a-paper-towel trick a bit difficult, so just hold the paper towel with a set of tongs.
Clean the exterior of the grill with a piece of fine-grade steel wool that’s been soaked in hot, soapy water. If you don’t have any steel wool, you can use a non-abrasive household sponge with soap and water.
And if you are planning on firing up your Argentine grill this winter, try this recipe for Argentine grilled flank steak with salsa criolla.
Argentine Grilled Flank Steak with Salsa Criolla
Ingredients:
4 ½ pounds of flank steak (the equivalent of three medium steaks), trimmed of excess fat
3 cloves of garlic, mashed into a paste, with a pinch of salt
1 tbsp. of black pepper
1 tbsp. of chili powder
2 tbsp. of chopped thyme
2 tsp. of brown sugar
1 ½ tbsp. and 2 tsp. of kosher salt
1 large diced tomato
Half a minced red bell pepper
½ cup of extra virgin olive oil
½ cup of white wine vinegar
Directions:
Combine 2/3 of the garlic, 1 tbsp. of thyme, 2 tsp. of black pepper, chili powder, brown sugar and 1 ½ tbsp. of salt.
Rub this spice mixture over the steaks. Cover and refrigerate them for four to 24 hours.
Make the salsa by combining the remaining garlic, 1 tbsp. of thyme, 2 tsp. of salt, 1 tsp. of black pepper, tomato, onion, red pepper oil and vinegar with two ounces of water in a one-quart container. Shake, and refrigerate until you’re ready to serve dinner.
Remove the steaks from the refrigerator. Let them get to room temperature before you grill them. Preheat the grill for five to 10 minutes.
Cook the steaks over a high heat for three to four minutes on each side. Let the steaks rest for five minutes before cutting them across the grain. Serve them with the salsa.
To learn more about our grills and our products, visit our website and read our blog to get Argentine grilling tips and other recipes. We’re confident you’ll find something you’ll enjoy.

Using Your Asado Rotisserie Grill Attachment
Our company’s name is Gaucho Grills, but you can use our products for more than just grilling.
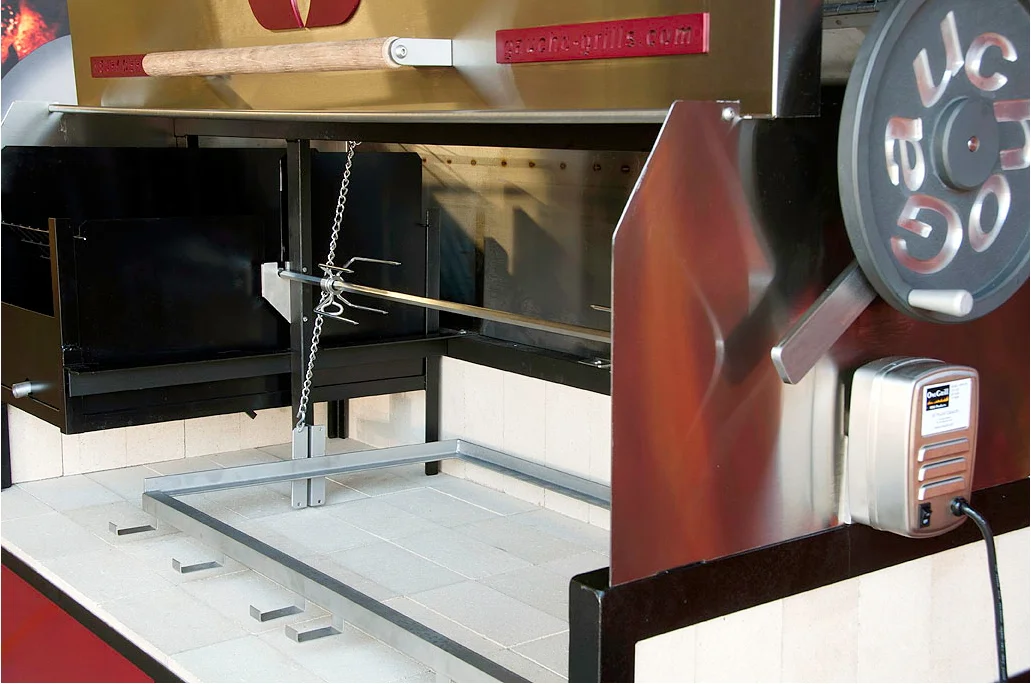
You can buy one of our grills with a rotisserie grill attachment, which snaps in place with just a few quick steps. When you watch this video, you’ll see that it takes less than a minute to make the switch from grilling to rotisserie.
Simply lower and remove the V-groove grill grates, detach the grease trough and attach the rotisserie bar, and you’re ready to cook.
And when you cook rotisserie style, you’re engaging in a time-honored method of food preparation enjoyed all over the world, from people in Greece spit-roasting lamb to the delectable babi gulig (spit-roasted pig) found on the island of Bali to the American traditional backyard barbecue.
No matter how you cook, there’s something about cooking around a fire that brings people together, and there are many foods that seem designed for a rotisserie grill:
Ribs
Whole fish
Rounded foods like turkey breasts, boneless legs of lamb
Duck
Chicken
Prime rib
Artichokes, eggplant, squash, potatoes and other vegetables.
Fruits such as pineapple (your rotisserie can even make dessert!)
So what should you cook with the newly-installed rotisserie?
Glad you asked. As always, we’re happy to share some recipes.

Our company’s name is Gaucho Grills, but you can use our products for more than just grilling.
You can buy one of our grills with a rotisserie grill attachment, which snaps in place with just a few quick steps. When you watch this video, you’ll see that it takes less than a minute to make the switch from grilling to rotisserie.
Simply lower and remove the V-groove grill grates, detach the grease trough and attach the rotisserie bar, and you’re ready to cook.
And when you cook rotisserie style, you’re engaging in a time-honored method of food preparation enjoyed all over the world, from people in Greece spit-roasting lamb to the delectable babi gulig (spit-roasted pig) found on the island of Bali to the American traditional backyard barbecue.
No matter how you cook, there’s something about cooking around a fire that brings people together, and there are many foods that seem designed for a rotisserie grill:
Ribs
Whole fish
Rounded foods like turkey breasts, boneless legs of lamb
Duck
Chicken
Prime rib
Artichokes, eggplant, squash, potatoes and other vegetables.
Fruits such as pineapple (your rotisserie can even make dessert!)
So what should you cook with the newly-installed rotisserie?
Glad you asked. As always, we’re happy to share some recipes.
Slow Roasted Barbecue Beef Roast
Ingredients:
5 lbs of boneless rump roast
2 cloves of garlic, sliced
1 tsp of Spanish paprika
1 tsp of salt
1 tsp of pepper
¼ teaspoon of dried rosemary
¼ teaspoon of dried thyme
Directions:
Prepare your grill for medium heat
Cut slits along all sides of the roast, and insert the sliced garlic into those slits.
Mix all of the remaining spices in a small bowl, and rub the mixture over the roast.
Place the roast on the rotisserie. Cook for 2-5 hours, until the meat reaches a minimum internal temperature of 145 degrees F. Allow the roast to rest for 20 minutes before slicing.
Peruvian Roasted Chicken
Ingredients:
1 whole chicken (about 4 lbs)
¼ cup of white vinegar
3 tbsp of white wine
3 tbsp of canola oil
2 tbsp of garlic powder
2 tbsp of paprika
4 tsp of cumin
2 tsp of black pepper
1 tsp of salt
Juice from one lemon
1 quart of cold water
Directions:
Combine the vinegar, wine, and oil with garlic powder, paprika, cumin, pepper and salt, mixing them until they form a paste.
Add lemon juice to the cold water
Trim the chicken of any loose fat, then wash the bird thoroughly with the lemon/water mixture.
Put the chicken in a Ziploc bag, and pour the spice paste over the chicken. Coat the chicken completely, rubbing the mixture into the surface and trying to get the paste under the chicken skin as much as possible.
Seal the bag and refrigerate the chicken for at least two hours. The longer the chicken marinates, the more flavor it will absorb. Take care not to let it marinate longer than 24 hours.
Preheat the grill and get the rotisserie ready. Cook the chicken for roughly 90 minutes at 300 degrees. Test the chicken for doneness by measuring the temperature at the thickest part of the thigh. The chicken will be finished when the temperature hits 165 F.
rotisserie1If you’re ready to try something new when cooking outdoors, Gaucho Grills can help. Whether you want to cook rotisserie style or over a grill, we carry grills inspired by the traditional Argentinian parilla.

Our grill designs allow outdoor chefs to raise or lower the grilling surface as they cook, meaning you can take your dishes to the next level, both literally and figuratively.
Vegetable Dishes and Sides for Your Asado Meal
“When we think of Argentine cuisine, we think of beef.”
Those were our words, about three months ago, right here on this blog.
And if you read most of our entries here, you know we love the idea of grilling a nice, juicy steak or a succulent piece of chicken.
But while meat might be the star of your cookout, it still needs its supporting cast. (You’ve also got your vegetarian guests to consider.)
With that in mind, we’ve put together a few suggestions for vegetable dishes and sides you can serve with your next asado meal.
Berenjena en Escabeche
This classic dish works as an appetizer or when paired with a meat. It’s a mix of eggplant, red pepper flakes and olive oil, hence its name. The literal translation is “marinated eggplant,” and you’ll need at least two days to let this dish marinate.
To prepare it, you’ll need:
2 medium eggplants, peeled
3 tablespoons of kosher salt
2 cups of white wine vinegar
2 cups of water
3 bay leaves
3 crushed garlic cloves
4 tablespoons of dried oregano
1 tablespoon of crushed red pepper
1 cup of olive oil
Start by cutting the peeled eggplants into thick slices, roughly ½ inches.
Put one layer of the eggplant in a colander and sprinkle it with salt. Keep making layers and repeating until you’ve used all the salt and eggplant.
The eggplant will drain, so be sure you put the colander in a sink or over a plate. Wait 30 minutes, press on the eggplant to drain more of the moisture and shake off the salt.
Give the eggplant a quick rinse to remove more of the salt, and pat it dry with paper towels.
Boil water and vinegar in a sauce pan along with the bay leaves. Place the eggplant in the sauce pan and cook it at a slow boil over a medium heat for about 4 minutes. Drain the eggplant.
Whisk the remaining ingredients – garlic, oil, pepper flakes, oregano – together.
Pour a tablespoon of dressing at the bottom of a ceramic or glass dish, and place a layer of eggplant on top. Top that layer with more dressing, and then repeat. Add more oil on top if necessary, and let the dish marinate in your refrigerator for at least two days for best results.
Ensalada de Zanahoria y Huevo
This might sound complicated, but it’s really a simple dish: carrot salad with egg. All you’ll need are some grated carrots and chopped hardboiled eggs, mixed together and dressed with salt, olive oil and vinegar. It’s a nice mixture of salt and sweetness, with the eggs providing a nice source of protein for any vegetarians at your dinner table.
Grilled Eggplant
Why should steak have all the fun on you asado grill? Follow this recipe next time you have a vegetarian guest.
To prepare it, you’ll need:
3 small eggplants (4-6 ounces each)
2 cloves of minced garlic
3 tablespoons of olive oil
1 teaspoon of oregano
1 teaspoon of dried basil
½ teaspoon of dried thyme
1 teaspoon of sweet or hot paprika
½ teaspoon of hot pepper flakes
Salt and black pepper, to taste
Cut the eggplants in half lengthwise. Mix garlic and oil in a small bowl, and then brush the mixture over the sides of the eggplants. Combine the various herbs and spices in another bowl and set them aside.
Grill the eggplants with the cut sides down until nicely brown, for about 3 to 4 minutes. Lightly brush the sides of the eggplant with the garlic/oil blend.
Flip the eggplant and brush the tops with the remaining oil. Sprinkle the herbs, salt and pepper over the eggplants, and cook with the cut sides up for another 6-8 minutes until the flesh is soft. Serve them fresh from the grill.
Cook like a Gaucho with our Latin-Inspired Grills
Visit the rest of our blog for grilling tips, recipes, grill maintenance advice, and much more. We feature many other recipes, including traditional Latin-inspired meals, and other traditional Argentine vegetable dishes.
No matter what you’re grilling, a Gaucho Grill will give you more room with which to cook. We’ve modeled our grills after the traditional parillas of Argentina. Visit our website to learn how we can help you prepare for your next cookout.

The Benefit of Grilling on V Groove Grill Grates
It’s time to make your world class burger. The 80/20 Beef has been prepped and formed. Your parrilla grill is hot. The grilling starts out great, the smells and sizzle indicate you got the start you’re looking for. But it doesn’t take long to put you back into a familiar panicked battle; How to keep your gourmet burgers from becoming smoldering hockey pucks!?

It’s time to make your world class burger. The 80/20 Beef has been prepped and formed. Your parrilla grill is hot. The grilling starts out great, the smells and sizzle indicate you got the start you’re looking for. But it doesn’t take long to put you back into a familiar panicked battle; How to keep your gourmet burgers from becoming smoldering hockey pucks!?
All grill chefs are familiar with the scene. A little too much smoke, and then bright flames bursting forth under your grilling surface. The more flames shoot up, the more fat drips, and the charring cycle begins. You do what you can to lower the heat, but the grease fire is going now and lowering the temp is not enough. You start the burger shuffle, moving your meat around the grill looking for an area that’s not on fire yet. You start to remember that having an extinguisher nearby would be a good idea, but you’re intent on saving the burgers, not dousing it with chemicals.

Minimize Grill Flare-Ups with V Groove Grill Grates
To those experienced with this heroic battle against meat dripping flare-ups, you’ve figured out some helpful practices to minimize the impact. Watch your heat. Handle the meat as little as possible. Keep a cooler area on your parrilla grill as a safe zone. These tips are helpful and useful for anyone cooking on an Argentine grill.
In addition to some smart grilling practices, there are also some useful tools to help you avoid this common grilling problem. One method to cut down on flare ups and grease fires is to utilize V Groove Grills that accommodate the run off from cooking meats and oil drippings.

A stainless steel V groove grill grate, when pitched at a proper angle will funnel runoff juices and fats from your grilled meat away from the meat and into a collection area. The V grooves trap the juices and keep it from rolling off the parrilla grill surface and back onto the coals or gas.
A catching trough attachment for the V grooves is a great help as well. A trough can collect juices for basting or simply serve as a better way to catch your grease and help keep your grill surface clean.
If you plan on using the rotisserie attachment for your Gaucho Grill, the V-groove grates are easily removed to make room for the attachment. Check out our blog about about using the rotisserie on your Argentinean grill for recipes, installation instructions, and more.
Enhance Your Asado Grilling Experience
With all the bells and whistles available on the grills you can buy from the big box stores, strongly consider a grill with a solid practical approach to some of the most basic problems encountered by all grilling enthusiasts. V Groove grill grates are one of those simple and practical tools that can elevate your outdoor cooking experience and save your meal.
Watch this video of a Gaucho Grills Insert with V Groove Grill Grates doing what it’s supposed to do. The heat and sizzle is plentiful, yet the grease doesn’t stoke a fire, but moves to the troughs where it will be easy to dispose and clean.

Grilling with your Himalayan Salt Block
Although used for thousands upon thousands of years, (See the Book of Job reference) today it seems like the use of salt has exploded in popularity more than ever. Try to find a seasoning or condiment that doesn’t advertise: “Made with all-natural sea salt.” Look and see how many pretty salt colors and flavors there are in your local spice shop or even grocery store. There are colored salts, flavored salts, smoked salts, salt cured meats, salt encrusted meats and fish, and on it goes. It’s even a hit in our desserts and coffees with “Sea-Salt Caramel” flavored everything.
So it was no surprise to us when we discovered the wonderful world of salts has now permeated into the grilling arena. Yes there are a thousand and one ways to season any of your grilled fare to perfection with salts. Recipes abound that call for all sorts of extravagant salted marinades and rubs. In addition, there perhaps is no better way to prepare a juicy grilled steak than to season it with a minimalist approach of some coarse kosher salt and cracked black pepper. However we’ve recently come to embrace the fantastic salt infusing method of grilling on top of a Pink Himalayan Salt Block. For a salt lover, this is truly a unique way to go.
“Can something tasteless be eaten without salt, or is there any taste in the white of an egg?” – Job 6:6
Although used for thousands upon thousands of years, (See the Book of Job reference) today it seems like the use of salt has exploded in popularity more than ever. Try to find a seasoning or condiment that doesn’t advertise: “Made with all-natural sea salt.” Look and see how many pretty salt colors and flavors there are in your local spice shop or even grocery store. There are colored salts, flavored salts, smoked salts, salt cured meats, salt encrusted meats and fish, and on it goes. It’s even a hit in our desserts and coffees with “Sea-Salt Caramel” flavored everything.
So it was no surprise to us when we discovered the wonderful world of salts has now permeated into the grilling arena. Yes there are a thousand and one ways to season any of your grilled fare to perfection with salts. Recipes abound that call for all sorts of extravagant salted marinades and rubs. In addition, there perhaps is no better way to prepare a juicy grilled steak than to season it with a minimalist approach of some coarse kosher salt and cracked black pepper. However we’ve recently come to embrace the fantastic salt infusing method of grilling on top of a Pink Himalayan Salt Block. For a salt lover, this is truly a unique way to go.
Why is a Salt Block Great for Grilling?
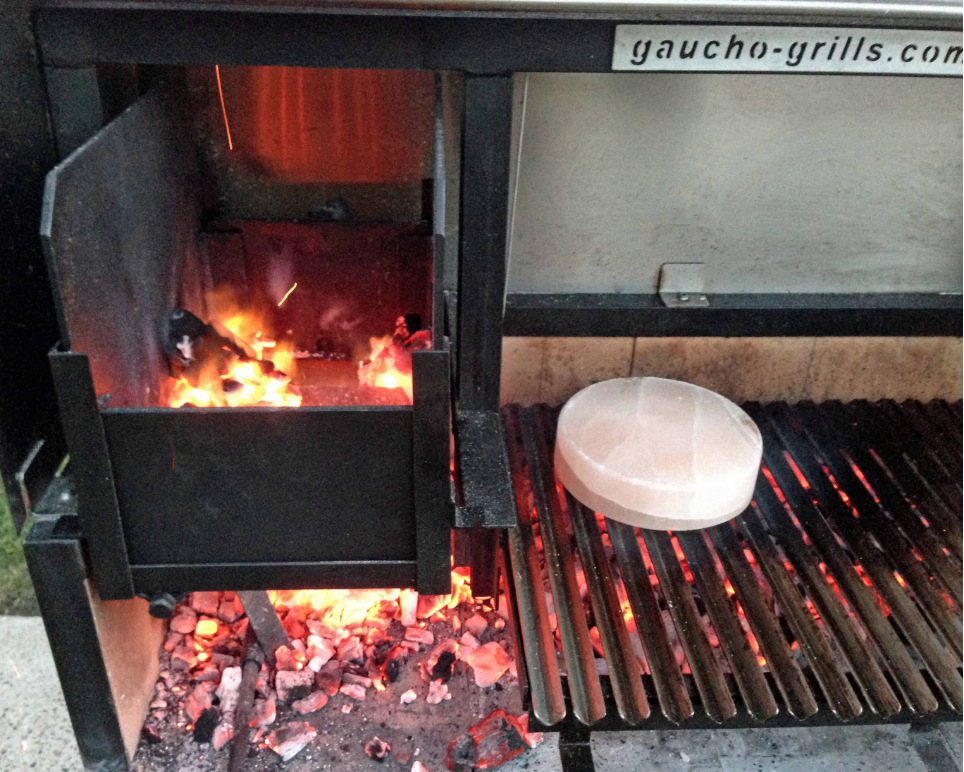
Asado grilling salt blockThe block of choice for us at Gaucho Grills is a 2” thick cut of pink marbled salt mined from the Himalayan mountain region. The thicker the block, the better the quality, the longer it will last, and the better the heat retention.
The beautiful pink coloring to these salt blocks not only makes it a nice presentation or serving vehicle, but is indicative of the mineral composites left in the salt itself. These minerals can have added health benefits over your traditional iodized white salts. The minerals also offer a more distinct flavor profile for those palates able to discern the mineral flavors embedded in the salt. (We know for some salt is just salty and that can be good as well.)
The key to grilling on these blocks is HEAT. Notice the emphasis, because if the block doesn’t get hot enough to sear your meat to it could very well ruin it. (A useful tool to measure the temperature of your grilling surface, and in this case, the salt block, is a simple infrared thermometer. Just point the little laser and scan the readout. I wouldn’t drop a piece of meat on the block until I at least see 375 degrees or higher.)
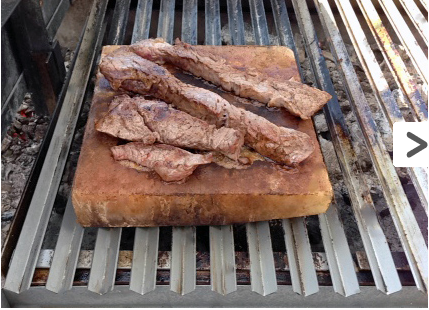
Once the block is hot enough to make your meat sizzle, drop a piece of unseasoned (at least unsalted) meat of choice and cook on it as you would a cast iron pan. The block is good for most any cut of meat. Steak is amazing but we’ve tried chicken, fish and shellfish, all with fantastic results.
With the meat cooking on the block, the juices will flow and you will start to see that pretty pink color start to turn brown as the salt block starts it’s seasoning process. Over time the meat juices will wear down the block, but a two inch thick slab of Himalayan salt should last quite a while. We’ve gotten entire grilling seasons out of one block even with weekly usage.
The cook time of the meat will vary on the cut and type of meat, but mostly on your saltiness taste preference. For steaks I like to hit each side for 5 minutes to impart the salt level I prefer. This is the part that will take some fun grilling practice, finding that perfect salt level to your taste.
Please know that the salt flavor will not just coat the top of the steak. The salt does infuse into the steak as it cooks. As the moisture of the meat releases, it draws in the salt flavor. That is why the heat is so critical. If the block is not hot enough, the meat will release its moisture but not sear properly. This will in affect draw in too much of the salt flavor and you will find your meat overly salty (we learned this the hard way with a bad scallop experience).
If you feel that you’ve grilled with your block long enough and your salt level has been reached but your meat is still not done to your preference, simply take your meat off the block and finish it on the grill. You can even work that process in reverse. Meat can be started on the grill and then finished off on the block if you desire.

Cleaning Your Pink Himalayan Salt Slab
cleaning parrilla salt blockAfter your fantastic grilled meal, it’s time to clean up your grilling area. With a Pink Himalayan Salt Slab, the cleaning is easy. The first step is the crucial one. Make sure, the block has cooled off enough that it’s safe to handle. These blocks retain heat very well and the block can be too hot to handle even if the rest of your grill has long cooled off. Once the block is cooled, wipe off any residue still stuck to the block.
After the larger residue is removed, a damp towel can be used to remove any of the finer residue and oils left behind. This water can add to the deterioration of the salt so use sparingly and wipe quickly followed by a thorough drying pat down after you’re done. With the block dry and free from moisture, wrap in a towel or stow in a plastic container. Keep the block stored in a dry area of your home. That’s it. No washing, soaking, soap or hassles. The ease of cleaning is found in the anti-bacterial properties of salt itself. Wipe off the junk, the salt will kill the rest. (Not to mention the 400+ degrees the next time you fire it up.)
The Pink Himalayan Salt Block is another culinary tool in your arsenal that can enhance your grilling experience. There are other ways to use the block around the kitchen as well. Blocks can be heated in the oven and used to cook table side. The temperature retention of the blocks are amazing. The blocks hold cold just as well as they hold the heat. Try freezing your block and use it as a beautiful serving tray for meats and shell fish. The anti-bacterial properties of the salt block are a perfect safety tool to take advantage of when using as a chilled serving dish.

Argentinean Grilling Terminology Guide
Over the past few months, we’ve been using this blog to teach readers their way around the world of Argentinian grilling. And now that you can walk the walk, we want you to be able to talk the talk, so to speak. That’s why we’ve put together this guide to Argentinean grilling terminology. The next time you host a cookout, you can impress your guests with your food and your lingo.

Over the past few months, we’ve been using this blog to teach readers their way around the world of Argentinian grilling. And now that you can walk the walk, we want you to be able to talk the talk, so to speak. That’s why we’ve put together this guide to Argentinean grilling terminology. The next time you host a cookout, you can impress your guests with your food and your lingo.
Asado Meat Cuts
Chorizo – This one might be part of your – or your guests’ – vocabulary, as chorizo is a popular dish in Mexican restaurants. But chorizo just means sausage, and the type of chorizo you find in Argentina really isn’t spicy, just juicy and delicious.
Ojo de bife – A classic rib eye steak, as common and beloved in Argentina as in America.
Vacio – Flank steak. We’ve also seen it referred to as “matambre,” a combination of the Spanish words matar (kill) and hambre (hunger), if you want to be fancy. Traveling in Argentina, you might find a dish called the “matambre relleno,” a meat roll stuffed with – depending on where you are – carrots, peppers or hardboiled egg.
Bife Angosto – Another American favorite: Porterhouse steak.
Entraña – Skirt steak, generally served in long strips.
Cuadril – Rump steak, typically served on sandwiches.
Entraña gruesa – Hanger steak, which is thicker than skirt steak.
Bife de costilla – T-bone steak
Bife de chorizo – Sirloin steaks, and despite their name, nothing to do with sausage.
Bife de lomo – Tenderloin, known more for its tenderness than its flavor. How tender? Some restaurants in Argentina make a point of cutting it with a spoon for patrons.
Asado Sandwiches
If you’re serving sandwiches, you may want to pick up these terms:
Choripan – Sausage served on a long roll.
Vaciopan – A flank steak sandwich.
Milanesa – A thin, breaded piece of fried beef.
Milanesa de pollo – The same sort of sandwich, but served with fried, breaded chicken.
Traditional Asado Dishes
And if you’re feeling really adventurous, plan a menu that includes these:
Chinchulines – Small intestines (like we said, these are for the adventurous)
Criadillas – Testicles (Really adventurous).
Morcilla – Blood sausage. Similar to what they call “black pudding” in England, this dish is pig’s blood mixed with ground up pork or offal.
If you’re looking for the best way to cook some of these cuts of meat, be sure to read our blog to find Argentinian grilling recipes.
And no true Argentinian-style cookout would be complete without the right grill. Gaucho Grills has designed its grills with the traditional Argentinian parillas in mind.
You’ll have more room to cook, and can give your guests a taste of Argentina from your backyard.

The Origins of Asado Style & Parrilla Grilling
When we think of Argentine cuisine, we think of beef. The Spanish brought cattle to Argentina in the 1500s, and beef has been a key part of the national cuisine ever since.
But just as important to this equation is the asado.
We’d call it “the Argentine version of the cookout,” but that only sort of does it justice.
It’s actually a practice that goes deep into the country’s history, men known as gauchos—legendary cattle wrangling figures – cooked their meals on makeshift grills which were the original parrilla grills.
As Daniel Duane wrote in Men’s Journal, Argentine beef is much different than the beef we get from American cows. Cattle in Argentina traditionally grazed on wild grasses, leading to a flavorful, ultra-lean meat.
“Since corn-fed American cattle produce a beef so marbled with saturated fat and so buttery-soft and mild-tasting, our grilling has gravitated toward a blast of initial heat that provides a crunchy texture and charred flavor on the outside while leaving the inside juicy and tender,” Duane says.
The gauchos took a different route: cooking over the low, even heat generated by embers, with no direct flame touching the steak.
Eventually this tradition migrated out of the grasslands into Argentinian homes. Today, asado means something more. It’s a social event, similar to the big family Sunday dinners some of us grew up with. Family and friends gather to enjoy various cuts of slow-cooked meats.
And instead of the typical propane grill, an asado meal is cooked over a parrilla, a grill heated with wood or coals. Beef is the star of the meal, of course, but menus can also include chorizo, sweetbreads, kidneys and chicken.
How does asado differ from barbecue?
Are you interested in turning your next BBQ into an asado? Consider these tips:
Remember two words: Slow and low. In other words, cook slowly, and over a low heat. You should let the flames die down all the way and cook over coals.
If you have wood, use it instead of charcoal. It will give you a much better flavor.
You’ll want to go easy on the seasoning: add some salt and pepper before grilling, and toss some fresh herbs onto the coal to augment the flavor. Some food bloggers suggest salting the meat late in the cooking stage for added juiciness.
After the meat has rested and you’re ready to serve, add some savory sauces. Chimichurri is to the asado as barbecue sauce is to the American cookout.
Now that we’ve covered those tips, let’s go back to Men’s Journal for their asado steak recipe.
You’ll need 10 to 12 ounces of grass-fed beef for each person, along with some coarse sea salt.
Light your grill and remember that you’re cooking over coals, not flames. Let the coals ash over completely before you start to cook. The recipe says you should use a medium-heat fire, one where you can hold your hand one inch off the grill bars for 2.5 seconds.
Cook the beef gently. You shouldn’t add salt at first, because this will dry out the meat. Instead, grill the steak for three minutes, flip it, and salt the grilled side.
Rotate the steak every few minutes for a total cooking time of 12 minutes. Use a squirt bottle to make sure no flame or smoke touches the meat.
It’s important to let any steak rest, but even more important with superlean grass-fed meat. Cut too early, and all of the juices will escape the steak. Let the steak rest for 15 minutes after you take it off the grill.
Learn more about parrilla grilling in PA
If you’re ready to cook like you’re in Buenos Ares, contact Gaucho Grills. We’ve designed our grills with the traditional parrillas in mind, meaning that grillers have more room to cook. We can help you turn your next backyard cookout into a true asado.